This sub-menu contains nine effects which are used to distort, transform or convolute the active layer or selection.
Distort Effects
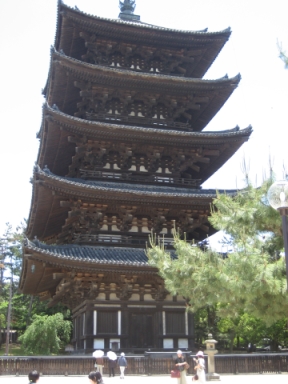
The following original image will be used to demonstrate the Distort effects:
Original Image
Note
The examples on this page show the effects being applied to an entire image. It is easy to restrict the adjustment to a sub-section of the image simply by making a selection.
If a selection is active when the effect is run, it will only be applied to the selected region. Areas outside of the active selection will remain unchanged.
Tip
The controls shown in the effect dialogs operate in much the same way; drag the indicator left, right or in a circular motion (for an angle control).
Typing in a numeric value in the text box or using the up/down arrows beside the text box also changes the current value.
The keyboard arrow keys can be used to alter the value of a control once it has the focus.
Multiple controls can be used in isolation or combination. If more than one is altered, the cumulative effect will be shown.
Bulge
This effect makes part of the layer or selection swell or shrink, as if the image had been stretched or squeezed.
Bulge controls the strength of the effect.
The Center shows where the effect will be interpreted from. Center is relocatable: use the double slider control or drag the cross hair in the thumbnail preview.
Edge Behavior: Options are Clamp, Wrap, Mirror and Transparent. These dictate what will happen if the bulge extends off the edge of the layer.
Quality reflects the smoothness of the edges. Higher values will yield smoother edges.
Example - Effects > Distort > Bulge
Crystalize
The Crystalize effect mimics the Pixelate effect (see below), but does so by transforming the enlarged pixels into a series of simple polygon shapes.
Cell Size controls the size of the shapes.
Quality reflects the smoothness of the edges. Higher values will yield smoother edges.
Randomize randomizes which pixels are used as the source color and the cell shape.
Example - Effects > Distort > Crystalize
Dents
This popular effect distorts the active layer or selection as if it was reflected in turbulent water or torn into small strips and roughly reassembled.
Scale determines how big or small the torn strips will be. Low values create more small pieces while large values generate fewer larger pieces.
Refraction is the amount of displacement from the original position. Smaller values create less turbulence while larger values increase the chaos.
Returning to the torn paper analogy; Detail dictates how roughly torn the strips will be and Turbulence is a measure of how wide the strips will be.
Quality reflects the smoothness of the edges. Higher values will yield smoother edges.
Angle rotates the effect pattern. To see this at work use a large Scale and rotate the Angle control.
Quality reflects the smoothness of the edges. Higher values will yield smoother edges.
Randomize randomizes the tearing of the strips into a new pattern.
Example - Effects > Distort > Dents
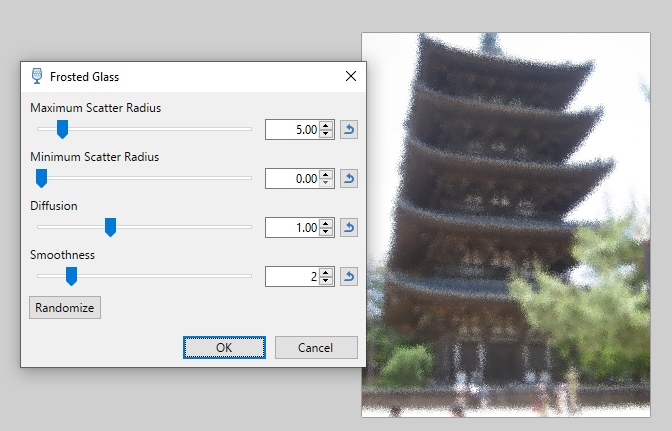
Frosted Glass
This will make the original appear as if it were being viewed through a sheet of frosted glass.
The Maximum and Minimum Scatter Radius sliders control the amount of scattering.
The Maximum setting determines how far a pixel can be displaced from its original position.
The Minimum setting defines the minimum displacement that will be applied.
Diffusion controls the strength of the effect by moderating the number of pixels involved. Higher Diffusion settings means more pixels will be scattered by the effect.
Smoothness controls the harshness of the displaced pixels. Low settings give a more jagged appearance. A higher setting applies antialiasing to smooth the results.
Randomize randomizes which pixels are used, resulting in a different outcome using the same parameters.
Example - Effects > Distort > Frosted Glass
Morphology
The Morphology effect has two modes, Erode and Dilate.
Erode reduces detail in an image by removing pixels from the boundaries of differing regions.
As the sampling size become larger, more and more detail is lost and the image increases in size as if each individual region was being repeatedly outlined.
Dilate holes in a uniform region and gaps between different regions are reduced.
As the sampling size increases, detail is lost and the image decreases in size as if a reducing blur had been applied.
The Width and Height sliders determine dimensions of the sampling size. The Linked checkbox forces the Width and Height to use the same value.
Example - Effects > Distort > Morphology
Pixelate
This effect greatly reduces detail by enlarging regularly sampled pixels. The resultant cells are usually square in shape, however using Scale Up with Bilinear or Bicubic will create rounded results.
Cell Size determines the size of the enlarged pixels. Higher values create larger sized squares.
Scale Down and Scale Up gives different algorithm options. These control how the pixels are reinterpreted.
Example - Effects > Distort > Pixelate
Polar Inversion
This applies a transformation between Cartesian and Polar coordinate systems.
The result is a radical positional transformation which recursively wraps the image around itself in an endlessly repeating pattern.
Scale is the strength of the effect. Offset is used to reset or relocate center point of the effect. Edge Behavior (Clamp, Reflect & Wrap) defines how the effect behaves as the transformation reaches then exceeds the edge of the canvas;
Clamp fills areas uncovered by the relocation of the original region with solid color.
Reflect fills areas uncovered by the relocation of the original region with a mirror image of the original.
Wrap repeats the original into areas uncovered by the relocation of the original region.
Quality defines the amount of detail. Lower settings lend a more jagged appearance to displaced pixels while higher settings give a smoother appearance.
Example - Effects > Distort > Polar Inversion
Tile Reflection
This makes the image appear as if reflected in a wall of mirrored tiles, each having a slight curvature to it's surface.
Angle controls the rotation or angle of the effect. The specified angle is in relation to horizontal. An angle of zero or 180 degrees will render the tiles as having top and bottom parallel to the horizon.
Tile Size determines the size of the tiles. The tiles always remain square.
Curvature is a measure of how much of the surroundings are reflected in each tile. In other words, it controls the amount of curvature of the tile edges.
Edge Behavior: Options are Clamp, Wrap, Reflect and Transparent. These dictate what will happen if the effect extends off the edge of the layer.
Quality defines the amount of detail. Lower settings lend a jagged appearance to displaced pixels while higher settings give smoother results.
Example - Effects > Distort > Tile Reflection
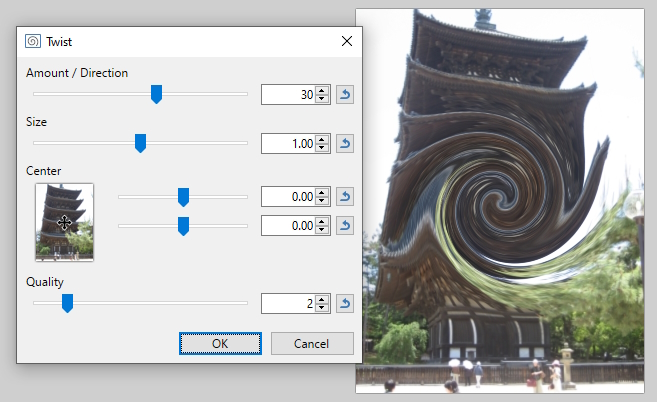
Twist
This effect mimics winding the image around a skewer placed through the viewing screen. Clockwise and counter-clockwise rotations are possible.
Amount/Direction control the number of ‘winds’ about the skewer. Use positive numbers for a clockwise twist and negative numbers for anticlockwise.
Size dictates how much of the image will be caught in the distortion. 1.00 represents the entire layer or selection, while smaller values will capture less.
Values larger than 1.00 cause the twist to behave as if it was applied to a surface larger than the canvas.
Center is the focal point of the effect.
Quality defines the amount of detail. Lower settings lend a jagged appearance while higher settings give a smoother appearance.
 Bulge
Bulge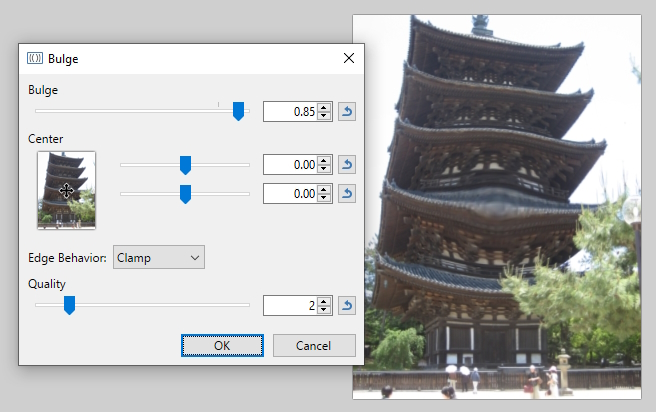
 Crystalize
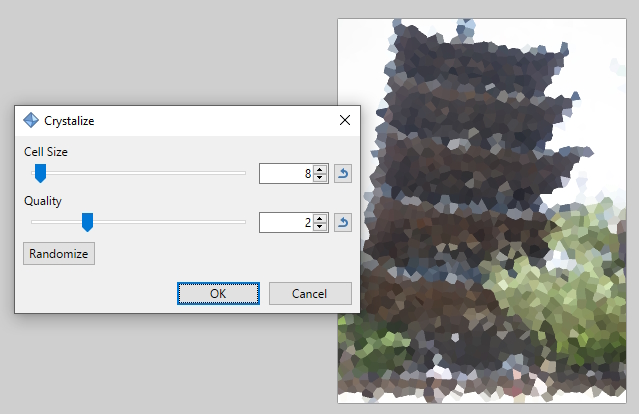
 Dents
Dents
 Frosted Glass
 Morphology
 Pixelate
 Polar Inversion
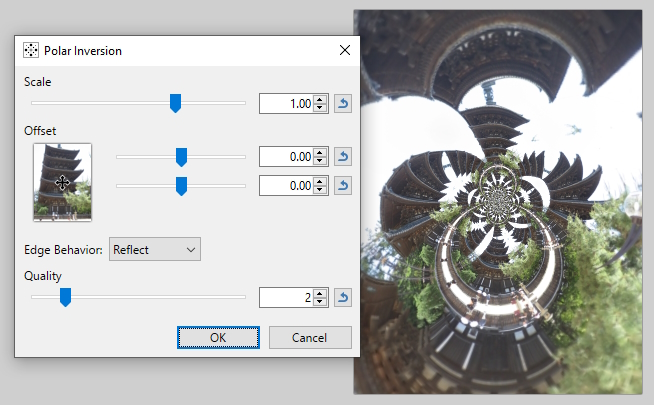
 Tile Reflection
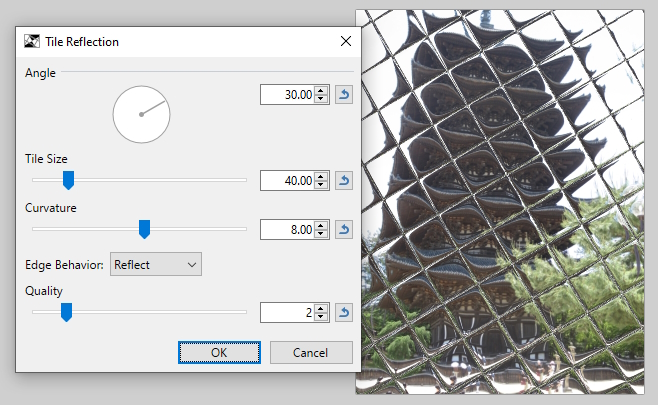
 Twist
Twist