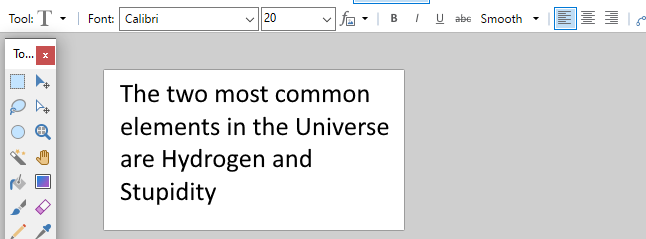
Text Tool 
T
This tool allows text to be typed onto the current layer using the
The
In a change from Paint.NET 3.5x,
Change the color of the text by changing the
While typing, notice the presence of a pulsing four-way arrow icon below and to the right of the blinking text cursor. This is called a control nub. It is used to move the text before it is "finished". Click and drag the nub to move the text while it is still active.
When text is complete, press the
Warning
When text is rendered to the layer it no longer exists as text characters, but only as pixels.
This means text cannot be re-edited using the
Text Tool Options

The first two controls in the
Text Metric
From v4.1, Text is rendered using Points for the font size measurement by default. The previous font size metric, "Fixed (96 DPI)" can be selected via the dropdown to the right of the font size.

Points (image DPI): Points are a unit of length, often used in typography and in print media. One point is equal to 1/72 of an inch. Text rendered in points will be scaled according to the image DPI (Dots Per Inch). The approximate pixel height will be number of points * image DPI / 96
Fixed (96 DPI): Adjusts the font size to match the default Windows resolution of 96 DPI where one pixel is equal to one dot on the computer screen. Text rendered using pixels will appear with a base height the same as the specified pixel size.
Text Formatting
There are four basic formatting options for text:
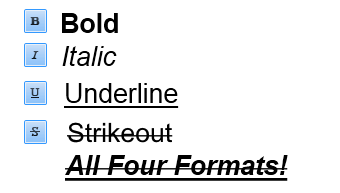
The formatting options can be combined by selecting multiple options simultaneously.
Text Rendering Modes
There are three text rendering modes:

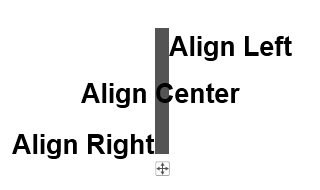
Text Justification
Justification can be explained as the direction that typed text will extend away from the initial cursor position. There are three justification options:
Align Left: Aligns the text to the left. Text will extend to the right of the initial cursor position.
Center Align: Aligns the text centrally. Text will extend equally to the right and left of the initial cursor position.
Align Right: Aligns the text to the right. Text will extend to the left of the initial cursor position.
The type of justification can be selected using the icons in the
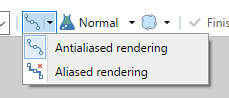
Antialiasing
There are two antialiasing modes associated with the
These settings dictate whether the text is rendered in a clip-to-pixel mode or not.
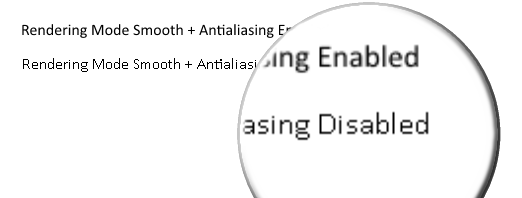
When
When
Antialiasing can be switched on or off via the
Positioning Text
Before text is committed to the canvas, it can be moved anywhere on the canvas. Click and drag the pulsing Move Icon (four-arrows-in-a-square) using either Mouse Button to reposition the text.
![]()
When the Move Icon is clicked and held, the keyboard arrow keys
Tip
We recommend always placing text on it's own transparent layer. If text needs to be edited, the layer can be erased and the text retyped.
The layer name makes a good place to store the font name, size and formatting used.